Kthreadd Mining Malware Solution

Kthreadd is a malware process, that will pop up again even we killed it. It will mostly attack through cron jobs by unknown ips. Also the cronjob will use more than 100% cpu and makes server unavailable to access.
Note:
Kthread is a default kernel process with PPid 1. (This is not the one we need to focus or check).

Basic Checking to kill the kthreadd Process:
1) Remove unwanted port opeing with cloud SG, mostly remove all the rules which is open to all.
2) Remove the unused users and change the ssh port. Then restart the sshd server.
3)Do basic ssh hardening steps like remove root password and change user password which having sudo access without password.
passwd -d root

Now try to list and check for kthreadd process and either kill or stop it.
ps -ef |grep kthreadd
kill -9 <Process_id>
Pkill -9f <PPid>


4) If its still not resolved, From /etc/sudoers remove user permissions which is having NOPASSWD for sudo access and create user with password for sudo switch and add it in visudo file.
<username> ALL=(ALL)   ALL instead 
<username> ALL=(ALL)       NOPASSWD: ALL

5)Change the password for the user which is added to the visudo file.
passwd <username>

Note:
Create random password for the user, 
cat /dev/urandom | tr -dc A-Za-z0-9 | head -c 13 ; echo ‘ ‘
 
6)Remove the authorized keys and known hosts entries.
cat /dev/null > authorized_keys 
cat /dev/null > known_hosts 
userdel –r <username with homedir> 

while IFS= read -r line; do userdel -r $line; done < <File_having_Userlist> 

7)Check the crontab and remove the newly added malware cronjob. Also check and remove the file which is referred in the cronjob.
crontab -l –> to check the cronjobs

8)Check the whole process command,
ps -aux | grep kthreadd

If kthreadd or kthreaddk run with any port then check whether thats related to any service and deny the Cloud SG rule for that particular remote ip and its subnet also.
Example we blocked the network 194.38.0.0 and the ip is 194.38.23.2/32

Apart from the above steps follow the basic ssh hardening steps to avoid the malware attacks:

1)Do not enable root user login for SSH client access. 
PermitRootLogin no  –> parameter in /etc/ssh/sshd_config file
 
2) Different Port number for ssh rather default 22. 
port 64004 –> parameter in /etc/ssh/sshd_config file 
 
3)Restart the SSH service 
service ssh restart 
 
4)Don’t forget Fail2ban 
yum install fail2ban 

Hope this will do trick for the malware attacks. Lets protect our servers against these MALWARES!!!!!!!!!!!!!!!!!!!!!!!!!


Centos sqlite3 import error while running docker command with GCP

Follow and run below steps to resolve the issue:

1) yum install -y gcc make sqlite-devel zlib-devel libffi-devel openssl-devel
Need reconfigure python 3+version 
2) Configure and install python again
##########################
cd python3.9.6
./configure
make clean
make && make altinstall
sudo ln -s /usr/local/bin/python3 /usr/bin/python3

Note:
while checking /bin/python3 it has to return the 3.9.6 , if you are going to use 3.6 then that has to be reconfigured and symlink has to be created.

sudo ln -sf /usr/bin/python2.7 /usr/bin/python  (Symlink is must to use YUM commands)

/bin/python3 –version

Now try the commands……….Hurray its working………….

Steps to use the azure artifact for customised pip packages with versioning

1) Need to create personal access token (PAT) to upload and download the package to azure artifact. 

–> Go to the Personal Access Tokens screen in <user_icon> => User (icon in top right)  

–> REF:  https://dev.azure.com/<Org_Name>/_usersSettings/tokens 

2) Generate a new token, with at least Packages/Read permissions selected 

3) we already created an artifact named “<Artifact_Name>” 

–> REF:  https://dev.azure.com/<Org_Name>/<Project_Name>/_artifacts/feed/<Artifact_Name> 

### Lets try to upload cs-utils latest version ### 

4) Create a file called pypirc in the home folder, 
=> open a file vi ~/.pypirc  

=> Replace the below content to the file, and replace username and password with your details. 

[distutils] 

Index-servers = <Org_Name> 

[<Org_Name>] 

Repository = https://pkgs.dev.azure.com/<Org_Name>/<Project_Name>/_packaging/<Artifact_Name>/pypi/upload/&nbsp;

username:<your_mail_id> 

password:<PAT> 

### Now install the required packages for uploading the pip package ### 

Pre-Requisites: 

Python – 3.0 or above 

Pip – 19.0 or above 

For other package versions please refer the below URL, 
REF: https://pypi.org/project/artifacts-keyring/ 

 
-> python -m pip install –upgrade pip 

-> pip install keyring artifacts-keyring twine 
  

5) Now clone the “<Repo’s_Packages>” repo and inside the folder run the following commands to create dist files and push it to the artifact, 
Note: 
For dependency package (requirement.txt) installation along with the main package need to update the setup.py file. kindly refer the attachment of setup.py file in the mail. Need to update the setup.py before running below commands. 

Before upload the package need to update the version in __init.py__ and remove the dist folder if already exists. 
python3 setup.py sdist bdist_wheel  
(you need to have wheel package to run this command. you can install it directly by pip command) 

python3 -m twine upload -r <Org_Name> dist/* –verbose 

6) Now go to artifact page and click on “connect to feed” to download the package or you can also refer this URL “https://dev.azure.com/<Org_Name>/<Project_Name>/_artifacts/feed/<Artifact_Name>/connect/pip” 

7) Create a pip.conf (mac/linux) or pip.ini (windows) file. Pip.conf can be created either in /etc or home folder.  
$HOME/.config/pip/pip.conf 
/etc/pip.conf 

8) Paste the snippet below into that file, and save it. Kindly don’t forgot to change the username and password. 

[global] 

index-url=https://<mail_id>:<PAT>@pkgs.dev.azure.com/<Org_Name>/<Project_Name>/_packaging/<Artifact_Name>/pypi/simple/ 

 
9) Now just run pip install {myPackage}, and it should work without a prompt. 
 

Tailon Installation

Tailon Installation Steps:

1) Install tailon package using pip,
pip install tailon

2) Create a script called tailon.sh to initiate the tailon as part of systemd service,
Open a file tailon.sh and copy below line,
/usr/local/bin/tailon -f /var/log/corestack-container/* -b 0.0.0.0:9000

3) copy below content in /etc/systemd/system/tailon.service

[Unit]
Description=Tailon for exposing logs
After=docker.target
[Service]
Type=simple
ExecStart=/bin/bash /opt/devops/tailon.sh
TimeoutStartSec=0
[Install]
WantedBy=default.target


4) Enable and Restart the tailon.service
systemctl enable tailon.service
systemctl restart tailon.service


5) Now you can see the tailon logs in the corresponding host with port number,
http://localhost:9000

Note:
If logs folder is updated with new logs , need to restart the tailon service to update the tailon ui page.

Appdynamic Machine Agent Installation and Verification

What is appdynamics?
The AppDynamics Business tool helps build dashboards that automatically correlate application performance to business outcomes. The ability to derive an in-depth understanding of the impact of technical issues on business objectives allows IT teams to prioritize their work in a way that ultimately improves ROI.

What is appdynamics agent?
AppDynamics agents are plug-ins or extensions that monitor the performance of your application code, runtime, and behavior. They’re deployed to every corner of your application environment, from devices, to containers and hosts, to applications.


1) Create directory to download and run the appdynamic agent installation,
mkdir -p /opt/appdynamics/machine-agent

2) Get into the directory and download the agent,
cd /opt/appdynamics/machine-agent

3) From this link download the required agent version which match with your OS.
https://accounts.appdynamics.com/downloads#
Example:
curl -L -O -H “Authorization: Bearer <Token_ID>” “https://download.appdynamics.com/download/prox/download-file/machine-bundle/21.12.1.3206/machineagent-bundle-64bit-linux-21.12.1.3206.zip&#8221;

4) Unzip the agent file,
unzip machineagent-bundle-64bit-linux-21.12.1.3206.zip

5) Open the conf file and edit the following parameters,
vi conf/controller-info.xml
Parameters to be changed,
<controller-host>test.appdynamics.com</controller-host>
<controller-port>443</controller-port>
<controller-ssl-enabled>true</controller-ssl-enabled>
<account-access-key>abcdefgh</account-access-key>
<account-name>test</account-name>


6) Lets start the machine agent and get it to be monitored from appdynamics,
<machine-agent-home-dir>bin/machine-agent -d -p pidfile

!!!!!!!!!! Hurray we done the installation and verify the server under appdynamics SERVERS list !!!!!!!!!!!!!!


APPDynamics PHP-Agent isntallation and verification:

What is PHP Agent?
The PHP agent component discovers and monitors business transactions, application services, and backends in your PHP application. It injects AppDynamics instrumentation into the application at runtime. The AppDynamics agent proxy is a Java process that handles the communication between the PHP agent and the Controller.

Steps to install PHP agent:
1) In the download page instead of choosing machine agnet select PHP agent and download the required file.

Example:
For centos you can choose RPM file and directly installed it by,
-> rpm -ivh <Downloaded-RPM-file>

2) If you have downloaded zip file then just unzip it by,
unzip appdynamics-php-agent.x86_64-21.7.0.4560.zip
3) Edit the installvars file,
cd appdynamics-php-agent-linux_x64
Replace your parameters like this,
#### cat installvars ####
APPD_CONF_ACCOUNT_NAME=’test’
APPD_CONF_ACCESS_KEY=’aaaaa’
APPD_CONF_CONTROLLER_HOST=’test.appdynamics.com’
APPD_CONF_CONTROLLER_PORT=’443′
APPD_CONF_SSL_ENABLED=’true’
APPD_CONF_APP=’test-app’
APPD_CONF_TIER=’app’

4) Now run the script named ‘runme.sh’.
bash runme.sh
5) You check check the agent installation by listing the process,
ps -ef |grep php

Thats it you have installed the php agent sucessfully……….

Monitoring multiple virtualhost from web server

  1. For monitor multiple virtual host from web server add below lines in all the virtual host definition in /etc/httpd/conf/httpd.conf

    <VirtualHost *:80>
    ServerName test.com
    DocumentRoot /var/www/html
    php_value agent.applicationName test-app
    php_value agent.tierName web
    php_value agent.nodeName test-app
    php_value agent.controller.hostName test.appdynamics.com
    php_value agent.controller.port 443
    php_value agent.accountName test
    php_value agent.accountAccessKey abcdefgh
    </VirtualHost>

    <VirtualHost *:443>
    ServerName test.io
    DocumentRoot /var/www/html
    php_value agent.applicationName test-app
    php_value agent.tierName web
    php_value agent.nodeName test-app
    php_value agent.controller.hostName test.appdynamics.com
    php_value agent.controller.port 443
    php_value agent.accountName test
    php_value agent.accountAccessKey abcdefgh
    </VirtualHost>

    IMPORTANT:
    *** Both installvars and httpdconf value should be same.

Appdynamics Pyhotn agent Installation and Verification

What is Python agent?

The Python Agent discovers, and maps and tracks metrics for business transactions, app services, and backends in your web application by injecting instrumentation into the Python application at runtime. The agent operates from inside the WSGI server that contains the instrumented application.

Lets see how to agent installation from Dockerfile,

1) Add below thing to your existing docker file, this includes ENV variables and staring agent by “pyagent”

####Docker file for python agent####

FROM python:3.9-bullseye
LABEL Environment=”Dev”
MAINTAINER kalaivani

ENV APPDYNAMICS_TCP_COMM_PORT=9091
ENV APPDYNAMICS_AGENT_APPLICATION_NAME=dev-app
ENV APPDYNAMICS_AGENT_TIER_NAME=web-external-api
ENV APPDYNAMICS_AGENT_REUSE_NODE_NAME=true
ENV APPDYNAMICS_AGENT_REUSE_NODE_NAME_PREFIX=test_api
ENV APPDYNAMICS_AGENT_ACCOUNT_NAME=test
ENV APPDYNAMICS_AGENT_ACCOUNT_ACCESS_KEY=abcdef
ENV APPDYNAMICS_CONTROLLER_HOST_NAME=test.appdynamics.com
ENV APPDYNAMICS_CONTROLLER_PORT=443
ENV APPDYNAMICS_CONTROLLER_SSL_ENABLED=true
ENV APPD_AGENT_VERSION=21.12.2.4693

ENV APPDYNAMICS_DEBUG_LOG=on
ENV APPDYNAMICS_LOGGING_LEVEL=debug

RUN pip install -U appdynamics==${APPD_AGENT_VERSION}

ENTRYPOINT [“/bin/bash”, “-c”, “/usr/local/bin/pyagent run — /usr/local/bin/python3.9 /opt/application/main.py”]

IMPORTANT:
Entrypoint line should replace with your application start command.

Once you done this check for the Aplication name in appdynamics dashboard!!!!!

Jenkins Shared Library and Calling Python script

What is shared library??
A shared library is a collection of independent Groovy scripts which you pull into your Jenkinsfile at runtime. The best part is, the Library can be stored, like everything else, in a Git repository. This means you can version, tag, and do all the cool stuff you’re used to with Git.

Structure of shared library:
The directory structure of a Shared Library repository is as follows:

(root)
+- src                     # Groovy source files
|   +- org
|       +- foo
|           +- Bar.groovy  # for org.foo.Bar class
+- vars
|   +- foo.groovy          # for global 'foo' variable
|   +- foo.txt             # help for 'foo' variable
+- resources               # resource files (external libraries only)
|   +- org
|       +- foo
|           +- bar.json    # static helper data for org.foo.Bar

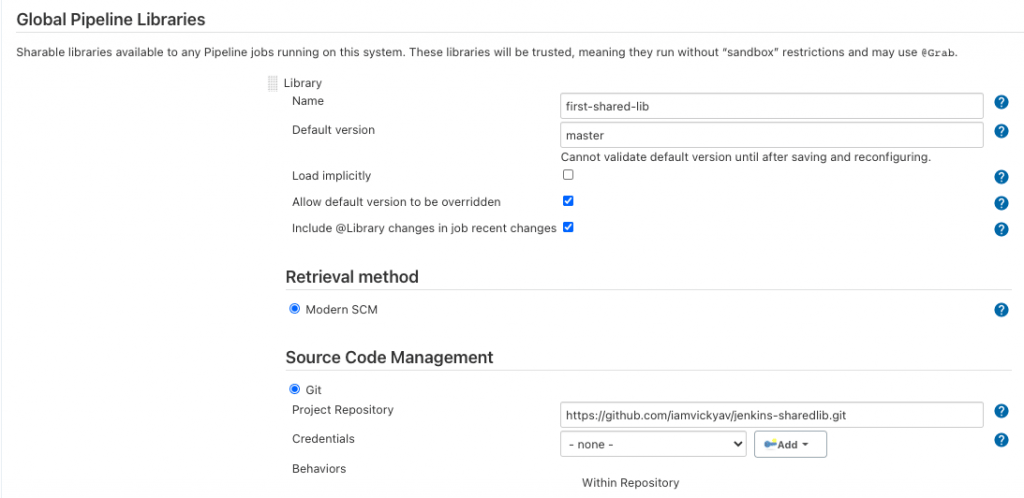
Configure Shared Library in Jenkins:
Before this we need to create a git repo which should have default structure. ie) it should have the three folders with the name src,vars and resources.

Steps to configure Jenkins pipeline library:
Step 1: Open Jenkins in your browser. (if local, http://localhost:8080/)
Step 2: Click on manage jenkins on the left side menu.
Step 3: Click on configure system. Scroll down until you find the Global Pipeline Libraries section.
Step 4: Under the Library section, configure values as below.

* Name (we will refer to this shared library from Jenkinsfile).
* Default version (branch name of our Shared Library git repo).
* Under the Retrieval method, choose Modern SCM.
* Under Source Code Management, choose Git.
    -> Enter your Pipeline Shared Libraries repo URL under Project Repository.
    -> Configure credentials if your repo needs authentication.

Step 5: Click on the save button.

Source Code Management

Steps to create groovy script:
1) Inside the resources put your scripts (bash or python scripts) which we are going to call from groovy .
–> cd resources
–> touch Monitor.py


####Example Monitor.py####
#!/usr/bin/python
print(“Test Pyhton Script”)


2) Now from the vars folder create a groovy file to call the python script (Monitor.py).
–> cd vars
–> touch Test_Monit.groovy

####Example Test_Monit.groovy####
def monit() {
pythonContent = libraryResource(‘Monitor.py’)
// Definitely better ways to do this without having to write to the consumer’s workspace
writeFile(file: ‘Monitor.py’, text: pythonContent)
sh(‘chmod +x Monitor.py’)
sh(‘python3 Monitor.py )
}

Lets create pipeline:
1) Login jenkins
2) Select “New Item” and create pipeline project.
3) Scroll down for pipeline section and select pipeline script option.

####Example pipeline script####
@Library(‘first_shared_lib@branch_name’) _
node(‘label_of_server’) {
Test_Monit.monit()
}


Now save the configuration and start the build.

Enjoy creating yor own shared library and call the functions from pipeline to avoid repetation of scripting !!!!!!!!!!!!


Rundeckd stopped after start

Follow below steps to understand and resolve the issue:

1) Remove the /var/run/rundeck.pid file in order to delete the zombie process.
rm /var/run/rundeck.pid

2) Check for any other zombie process using lsof commmand.
lsof |grep rundeck
lsof |grep <Port_Number>


3) Reownership the rundeck related folders (Owner should be rundeck)
Chown -R rundeck:rundeck /var/rundeck/
Chown -R rundeck:rundeck /var/lib/rundeck/
Chown -R rundeck:rundeck /var/log/rundeck/
Chown -R rundeck:rundeck /etc/rundeck/


4) Restart the rundeckd service.
service rundeckd restart

5) Hurray!!! its running inside the container well.

9 Easy Steps To Increase Your Root Volume Of AZURE Instance

Resize RHEL server OS disk in Azure:

Pre-Requisite:
1.Create an image of your VM disk.

Images –> Add –> Give Name, Storage blob URL, ResourceGroup, OS Type –> Create

2.Stop the VM

VM –> Overview –> Stop

For Ubuntu:

VM –> Disks –> click on OS Disk –>> Change the Size –>> Save

For Ubuntu this will take effect directly.

For RHEL follow the below steps.

Steps to increase the volume:
start your instance and run the following command as root user or root privileged user.

1) fdisk /dev/sda => Replace sda with your partition to change the size

2) Command (m for help): => Prompt will be like this

3) Type ‘p’ => Will show partitions like /dev/sda1 , /dev/sda2 etc…

4) Type ‘d’ then partition number to delete => If you are going to resize sda2 give ‘2’

5) Type ‘n’ then ‘p’, 2 (to recreate partition 2) you can accept the default values

6) Type ‘w’ => It will update partition table with new sector range

7) Type ‘q’ => To exit fdisk

8) sudo reboot => Reboot the VM to update the partition

9) sudo xfs_growfs /dev/sda2 => At last execute the below command to update the partition in file system
Note: For RHEL 6 version use, sudo resize2fs /dev/sda2

Using Azure-cli can resize the root disk of managed disk:
1) Login to azure cli
az login
2) Stop the VM
az vm deallocate –resource-group <ResourceGroup> –name <VMName>
3) Get the list of disks in the resource group of VM
az vm list –resource-group <ResourceGroup> –query “[*].{Name:name,DiskName:storageProfile.osDisk.name}” –output table
4) Update the disk size
az disk update –resource-group <ResourceGroup> –name <DiskName> –size-gb <NewSize>
5) Now check the updated disk size
az disk list –resource-group <ResourceGroup> –query “[?name == ‘<DiskName>’].{Name:name, DiskSize:diskSizeGb}” –output table
6) Start the VM
az vm start –resource-group <ResourceGroup> –name <VMName>
7) After resize have to follow the above common steps to reflect the updated size.

Supervisor service status check

#########################################################################################################################
#Usage: python <script_Name.py> –To_Mailid <Mail to whom> –Sender <From_Mail> –Passwd_Enc <Base64_encrypted Passwd>
########################################################################################################################

import subprocess,socket,os,sys
import smtplib,argparse
import base64
import sys

parser = argparse.ArgumentParser(description=”Service_check”)
parser.add_argument(‘–To_Mailid’, type=str, help=”Enter mail id to send mail”, required=True)
parser.add_argument(‘–Sender’, type=str, help=”Enter the username of sender mail id”, required=True)
parser.add_argument(‘–Passwd_Enc’, type=str, help=”Enter Base64 encrypted password”, required=True)

args = parser.parse_args()
inputs = {“To_Mailid”: args.To_Mailid, “Sender”: args.Sender, “Passwd_Enc”: args.Passwd_Enc}

Hostname=socket.gethostname()

def Send_mail(sub,msg):

sendto = args.To_Mailid
user= args.Sender
password = base64.b64decode(args.Passwd_Enc)
smtpsrv = “smtp.office365.com”
smtpserver = smtplib.SMTP(smtpsrv,587)
smtpserver.ehlo()
smtpserver.starttls()
smtpserver.ehlo
smtpserver.login(user, password)
msgbody = message = ‘Subject: {}\n\n{}’.format(sub, msg)
smtpserver.sendmail(user, sendto, msgbody)
smtpserver.close()
def supervisor_main():
suppid=”ps -ef | grep -w supervisor | grep -v grep | wc -l”
status = subprocess.check_output(suppid, shell=True)
if status > 0:
supervisor_services()
else:
command=”service supervisor start && sleep2″
subprocess.check_output(“command”, shell=True)
subj=”%s supervisor status” % Hostname
msg=”Hi All,\n\nsupervisor has been started on %s. \n\nThanks\nCorestack Team” % Hostname
Send_mail(subj,msg)
def supervisor_services():
services = []
Running_services = []
command=”supervisorctl status | awk ‘{print $1}’ 2>>/dev/null”
services=subprocess.check_output(command,shell=True)
List_Services = services.split(‘\n’)
while(“” in List_Services):
List_Services.remove(“”)

for each_service in List_Services:
service_command=”supervisorctl status |grep -w %s | awk {‘print $2′}” % each_service
service_status = subprocess.check_output(service_command, shell=True)
if str(service_status.strip()) != “RUNNING”:
Running_services.append(each_service)
subj=”Services which are all not running on %s” % Hostname
msg=”Hi All,\n\nFollowing services are not running on %s \n%s. \n\nThanks\nCorestack Team” % (Hostname,’,’.join(Running_services))
Send_mail(subj,msg)

supervisor_main()

SSL Configuation for Multiple domain

For Apache:

Step 1:

Create two different domain entries in cloudflare for a corestack setup IP.

Example: Redirect ip to Example1.domain.com and Example2.domain.com

IP_Address: Example1.domain.com
IP_Address: Example2.domain.com

Step 2:

Create Multi virtual host in apache2

Step3:

How to create Multi virtual host in Apache2:

3.1) Already having 2 sites enabled in corestack setup with the conf file name 000-default.conf and coreui_files.conf.
3.2) Just add Server Name in both the conf files if its not otherwise just change the domain name.
Note: comment out Server Name and change like below

In 000-default.conf: Open file in vi editor,

vi /etc/apache2/sites-enabled/000-default.conf

Server Name Example1.domain.com

RewriteEngine on

RewriteRule ^(.*)$ https://Example1.domain.com$1 [L,R=301]

In coreui_files.conf: Open file in vi editor,
vi /etc/apache2/sites-enabled/coreui_files.conf

ServerName Example2.domain.com
RewriteEngine on

RewriteRule ^(.*)$ https://Example2.domain.com$1 [L,R=301]


4) Enable ssl in apache:
How to enable ssl in apache:

4.1) Run the following commands,

a2enmod ssl
service apache2 restart
cd /etc/apache2/sites-available
a2ensite default-ssl.conf

service apache2 reload

4.2) Keep your certificate in the path /usr/local/ssl/private/<Folder_Web_Server2_Name> and /usr/local/ssl/private/<Folder_Web_Server_Name>

Each folder should have 3 files named xxx.crt ,xxx.key and bundle-xxx.crt.

Note:

You have to create 2 different certicates for both web and file server, then keep those files in corresponding folders. If its wildcard certificate you can use the same certificate for both the virtual hosts.

4.3) Remove content from default-ssl.conf and add below contents,


<IfModule mod_ssl.c>

<VirtualHost _default_:443>

ServerAdmin webmaster@localhost

ServerName Example2.domain.com

#DocumentRoot /var/www/html

DocumentRoot /var/www/html/coreui_files

# Available loglevels: trace8, …, trace1, debug, info, notice, warn,

# error, crit, alert, emerg.

# It is also possible to configure the loglevel for particular

# modules, e.g.

#LogLevel info ssl:warn

ErrorLog ${APACHE_LOG_DIR}/error.log

CustomLog ${APACHE_LOG_DIR}/access.log combined

# Enable/Disable SSL for this virtual host.

SSLEngine on

# If both key and certificate are stored in the same file, only the

# SSLCertificateFile directive is needed.

#SSLCertificateFile /usr/local/ssl/private/claas_corestack_io.crt

#SSLCertificateKeyFile /usr/local/ssl/private/private.key

SSLCertificateFile /usr/local/ssl/private/<Folder_Web_Server2_Name>/xxxxx.crt

SSLCertificateKeyFile /usr/local/ssl/private/<Folder_Web_Server2_Name>/xxxxx.key

SSLCertificateChainFile /usr/local/ssl/private/<Folder_Web_Server2_Name>/gbundle_xxxx.crt

<FilesMatch “\.(cgi|shtml|phtml|php)$”>

SSLOptions +StdEnvVars

</FilesMatch>

<Directory /usr/lib/cgi-bin>

SSLOptions +StdEnvVars

</Directory>

BrowserMatch “MSIE [2-6]” \

nokeepalive ssl-unclean-shutdown \

downgrade-1.0 force-response-1.0

# MSIE 7 and newer should be able to use keepalive

BrowserMatch “MSIE [17-9]” ssl-unclean-shutdown

</VirtualHost>

<VirtualHost _default_:443>

ServerAdmin webmaster@localhost

ServerName Example1.domain.com

#DocumentRoot /var/www/html

DocumentRoot /var/www/html/core

# Available loglevels: trace8, …, trace1, debug, info, notice, warn,

# error, crit, alert, emerg.

# It is also possible to configure the loglevel for particular

# modules, e.g.

#LogLevel info ssl:warn

ErrorLog ${APACHE_LOG_DIR}/error.log

CustomLog ${APACHE_LOG_DIR}/access.log combined

# SSL Engine Switch:

# Enable/Disable SSL for this virtual host.

SSLEngine on

# If both key and certificate are stored in the same file, only the

# SSLCertificateFile directive is needed.

#SSLCertificateFile /usr/local/ssl/private/claas_corestack_io.crt

#SSLCertificateKeyFile /usr/local/ssl/private/private.key

SSLCertificateFile /usr/local/ssl/private/<Folder_Web_Server_Name>/xxxxxx.crt

SSLCertificateKeyFile /usr/local/ssl/private/<Folder_Web_Server_Name>/xxxxx.key

SSLCertificateChainFile /usr/local/ssl/private/<Folder_Web_Server_Name>/bundle-xxxx.crt

# Certificate Authority (CA):

# Set the CA certificate verification path where to find CA

# certificates for client authentication or alternatively one

# huge file containing all of them (file must be PEM encoded)

# Note: Inside SSLCACertificatePath you need hash symlinks

# to point to the certificate files. Use the provided

# Makefile to update the hash symlinks after changes.

#SSLCACertificatePath /etc/ssl/certs/

#SSLCACertificateFile /etc/apache2/ssl.crt/ca-bundle.crt

# Certificate Revocation Lists (CRL):

# Set the CA revocation path where to find CA CRLs for client

# authentication or alternatively one huge file containing all

# of them (file must be PEM encoded)

# Note: Inside SSLCARevocationPath you need hash symlinks

# to point to the certificate files. Use the provided

# Makefile to update the hash symlinks after changes.

#SSLCARevocationPath /etc/apache2/ssl.crl/

#SSLCARevocationFile /etc/apache2/ssl.crl/ca-bundle.crl

<FilesMatch “\.(cgi|shtml|phtml|php)$”>

SSLOptions +StdEnvVars

</FilesMatch>

<Directory /usr/lib/cgi-bin>

SSLOptions +StdEnvVars

</Directory>

BrowserMatch “MSIE [2-6]” \

nokeepalive ssl-unclean-shutdown \

downgrade-1.0 force-response-1.0

# MSIE 7 and newer should be able to use keepalive

BrowserMatch “MSIE [17-9]” ssl-unclean-shutdown

</VirtualHost>

<Directory “/var/www/html”> # if site is in root folder

AllowOverride All

</Directory>

<Directory “/var/www/html/core”> # Folder Configured for Site

AllowOverride All

</Directory>

</IfModule>

4.3) Then change the Redly mentioned parameters in both virtual hosts,

4.3.1) ServerName should be replaced by newly create domain name.
4.3.2) Folder_Web_Server_Name should be replaced by web server certicate folder name.
4.3.3) Folder_Web_Server2_Name should be replaced by file server certificate folder name.

Note: Certificate files should be kept in the particular paths.

5) Run “service apache2 restart” at the end.

For RHEL:

Step 1:

Create two different domain entries in cloudflare for a corestack setup IP.

Example: Redirect ip to Example1.domain.com and Example2.domain.com

IP_Address: Example1.domain.com
IP_Address: Example2.domain.com

Step 2:

Add the following lines in /etc/httpd/conf/httpd.conf,

LoadModule rewrite_module modules/mod_rewrite.so

IncludeOptional sites-enabled/*.conf


Step3:

Created 2 virtual hosts under /etc/httpd/sites-available,

How to create Multi hosts:

Create 2 conf files named core.conf and coreui_files.conf,

cd /etc/httpd/sites-available

touch core.conf
touch coreui_files.conf

Copy the following content in core.conf file,

<VirtualHost *:80>

ServerName Example1.domain.com

DocumentRoot /var/www/html/core

RewriteEngine on

RewriteRule “^/?(.*)” “https://Example1.domain.com/$1″ [R=301]

</VirtualHost>

<Directory “/var/www/html”> # if site is in root folder

AllowOverride All

</Directory>

<Directory “/var/www/html/core”> # Folder Configured for Site

AllowOverride All

</Directory>

Copy the following content in coreui_files.conf,

<VirtualHost *:80>

ServerName Example2.domain.com

DocumentRoot /var/www/html/coreui_files

RewriteEngine on

RewriteRule “^/?(.*)” “https://Example2.domain.com/$1″ [R=301]

</VirtualHost>

Step4:
Enable ssl module :

yum install mod_ssl

systemctl restart httpd

4.1) Keep your certificate in the path /etc/httpd/ssl/<Folder_Web_Server2_Name> and /etc/httpd/ssl/<Folder_Web_Server_Name>

Each folder should have 3 files named xxx.crt ,xxx.key and bundle-xxx.crt.

Note:

You have to create 2 different certicates for both web and file server, then keep those files in corresponding folders. If its wildcard certificate you can use the same certificate for both the virtual hosts.

4.2) Open /etc/httpd/conf.d/ssl.conf in vi editor and copy the below content to the file,

vi /etc/httpd/conf.d/ssl.conf

#

# When we also provide SSL we have to listen to the HTTPS port in addition.

Listen 443 https

# Pass Phrase Dialog:

# Configure the pass phrase gathering process.

# The filtering dialog program (`builtin’ is a internal terminal dialog) has to provide the pass phrase on stdout.

SSLPassPhraseDialog exec:/usr/libexec/httpd-ssl-pass-dialog

# Inter-Process Session Cache:

# Configure the SSL Session Cache: First the mechanism

# to use and second the expiring timeout (in seconds).

SSLSessionCache shmcb:/run/httpd/sslcache(512000)

SSLSessionCacheTimeout 300

# Pseudo Random Number Generator (PRNG):

Read the mod_ssl User Manual for more details.

SSLRandomSeed startup file:/dev/urandom 256

SSLRandomSeed connect builtin

#SSLRandomSeed startup file:/dev/random 512

#SSLRandomSeed connect file:/dev/random 512

#SSLRandomSeed connect file:/dev/urandom 512

# Use “SSLCryptoDevice” to enable any supported hardware

# accelerators. Use “openssl engine -v” to list supported

# engine names. NOTE: If you enable an accelerator and the

# server does not start, consult the error logs and ensure

# your accelerator is functioning properly.

SSLCryptoDevice builtin

#SSLCryptoDevice ubsec

## SSL Virtual Host Context

<VirtualHost _default_:443>

# General setup for the virtual host, inherited from global configuration

DocumentRoot “/var/www/html/core”

ServerName Example1.domain.com

ServerAlias Example1.domain.com

# Use separate log files for the SSL virtual host; note that LogLevel

# is not inherited from httpd.conf.

ErrorLog logs/ssl_error_log

TransferLog logs/ssl_access_log

LogLevel warn

# SSL Engine Switch:

# Enable/Disable SSL for this virtual host.

SSLEngine on

# SSL Protocol support:

SSLProtocol all -SSLv2 -SSLv3

# SSL Cipher Suite:

SSLCipherSuite HIGH:3DES:!aNULL:!MD5:!SEED:!IDEA

# Server Certificate:

SSLCertificateFile /etc/httpd/ssl/<Folder_Web_Server_Name>/xxxx.crt

# Server Private Key:

SSLCertificateKeyFile /etc/httpd/ssl/<Folder_Web_Server_Name>/xxxx.key

# Server Certificate Chain:

SSLCertificateChainFile /etc/httpd/ssl/<Folder_Web_Server_Name>/bundle_xxx.crt

#SSLOptions +FakeBasicAuth +ExportCertData +StrictRequire

<Files ~ “\.(cgi|shtml|phtml|php3?)$”>

SSLOptions +StdEnvVars

</Files>

<Directory “/var/www/cgi-bin”>

SSLOptions +StdEnvVars

</Directory>

BrowserMatch “MSIE [2-5]” \

nokeepalive ssl-unclean-shutdown \

downgrade-1.0 force-response-1.0

# Per-Server Logging:

# The home of a custom SSL log file. Use this when you want a

# compact non-error SSL logfile on a virtual host basis.

CustomLog logs/ssl_request_log \

“%t %h %{SSL_PROTOCOL}x %{SSL_CIPHER}x \”%r\” %b”

</VirtualHost>

<VirtualHost _default_:443>

# General setup for the virtual host, inherited from global configuration

DocumentRoot “/var/www/html/coreui_files”

ServerName Example2.domain.com

#ServerAlias exam.domain.com

# Use separate log files for the SSL virtual host; note that LogLevel

# is not inherited from httpd.conf.

ErrorLog logs/ssl_error_log

TransferLog logs/ssl_access_log

LogLevel warn

# SSL Engine Switch:

# Enable/Disable SSL for this virtual host.

SSLEngine on

# SSL Protocol support:

SSLProtocol all -SSLv2 -SSLv3

# SSL Cipher Suite:

SSLCipherSuite HIGH:3DES:!aNULL:!MD5:!SEED:!IDEA

# Server Certificate:

SSLCertificateFile /etc/httpd/ssl/<Folder_Web_Server2_Name>/xxx.crt

# Server Private Key:

SSLCertificateKeyFile /etc/httpd/ssl/<Folder_Web_Server2_Name>/xxxx.key

# Server Certificate Chain:

SSLCertificateChainFile /etc/httpd/ssl/<Folder_Web_Server_Name>/bundle-xxx.crt

# Certificate Authority (CA):

#SSLOptions +FakeBasicAuth +ExportCertData +StrictRequire

<Files ~ “\.(cgi|shtml|phtml|php3?)$”>

SSLOptions +StdEnvVars

</Files>

<Directory “/var/www/cgi-bin”>

SSLOptions +StdEnvVars

</Directory>

# SSL Protocol Adjustments:

BrowserMatch “MSIE [2-5]” \

nokeepalive ssl-unclean-shutdown \

downgrade-1.0 force-response-1.0

# Per-Server Logging:

# The home of a custom SSL log file. Use this when you want a

# compact non-error SSL logfile on a virtual host basis.

CustomLog logs/ssl_request_log \

“%t %h %{SSL_PROTOCOL}x %{SSL_CIPHER}x \”%r\” %b”

</VirtualHost>

Step 5:

Restart the httpd server.

systemctl restart httpd